
Create a Profile
PROFILE SETTINGS: for Individual Professionals
WATCH VIDEO TUTORIAL >
CREATING AN ACCOUNT:
It’s free and easy to set up a profile to highlight your creative goals.
Go to stagedoorcasting.com > LOG IN > New User Registration to create an account with your name, email, user handle, and password. There is no cost to create an account.
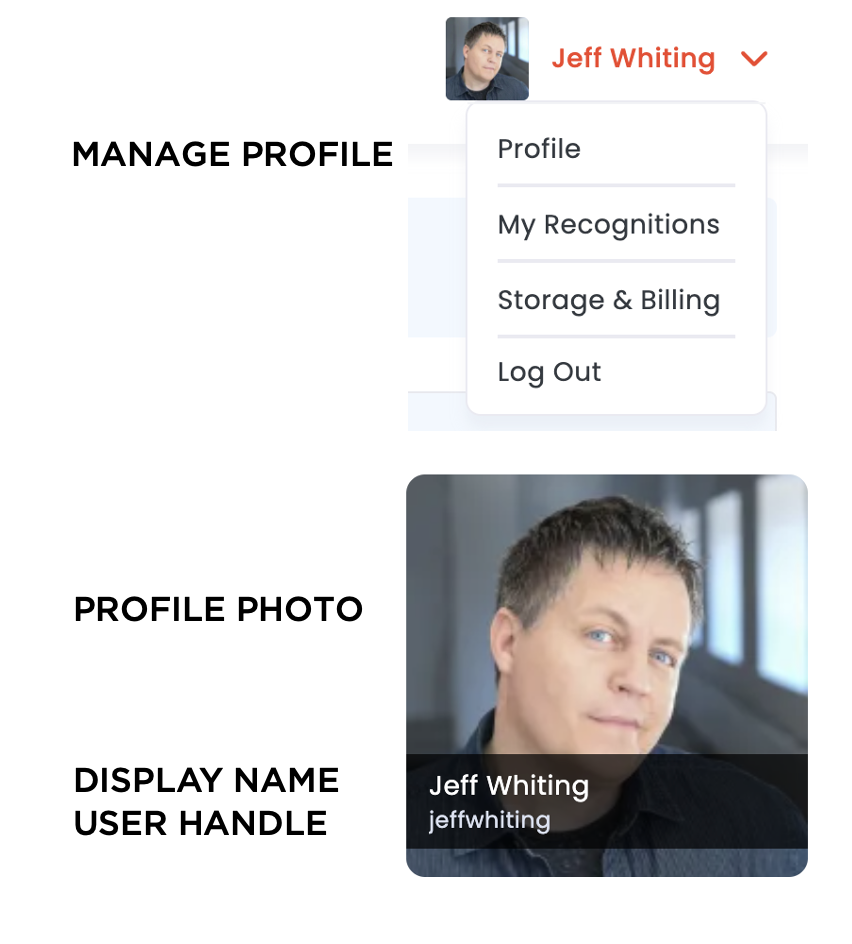
MANAGE PROFILE: Click on your name (top right corner) > Profile
USER HANDLE: Choose a unique username which will show on your profile.
If you wish to change your username, you can make a request HERE.
NAME | DISPLAY NAME: Enter your name or add a Display Name (the name you wish to show on your profile).
For organizations, you can use your Organization Name if you wish.
PROFILE PHOTO: Add at least one profile photo.
Profile > Edit Profile > Change Profile > Upload Image > Crop > Save
File Size 5MB (jpg, png)
If you don’t have at least one profile photo, your profile will not appear in the database or in searches.
CONTACT INFO: Enter the email, phone and visibility of your contact. You can place your representative contact in this area.
Visibility: Select who can view this contact information:
Public: Visible to everyone
Stage Door Network Users
My Network: Accounts added in your network,
Entities that you apply with
No one
LOCATION: Enter your home location. You can indicate if you are willing to travel and tour for work. Also, choose to show or hide this on your profile.
EDUCATION & TRAINING: Enter any training or education you have received. This information will appear in your profile.
PRO TIP: This is a good place to name drop. Hiring companies will often scan these names to see if they know someone you’ve worked with to learn about you.
HIRING COMPANIES, ORGANIZATIONS, AGENTS:
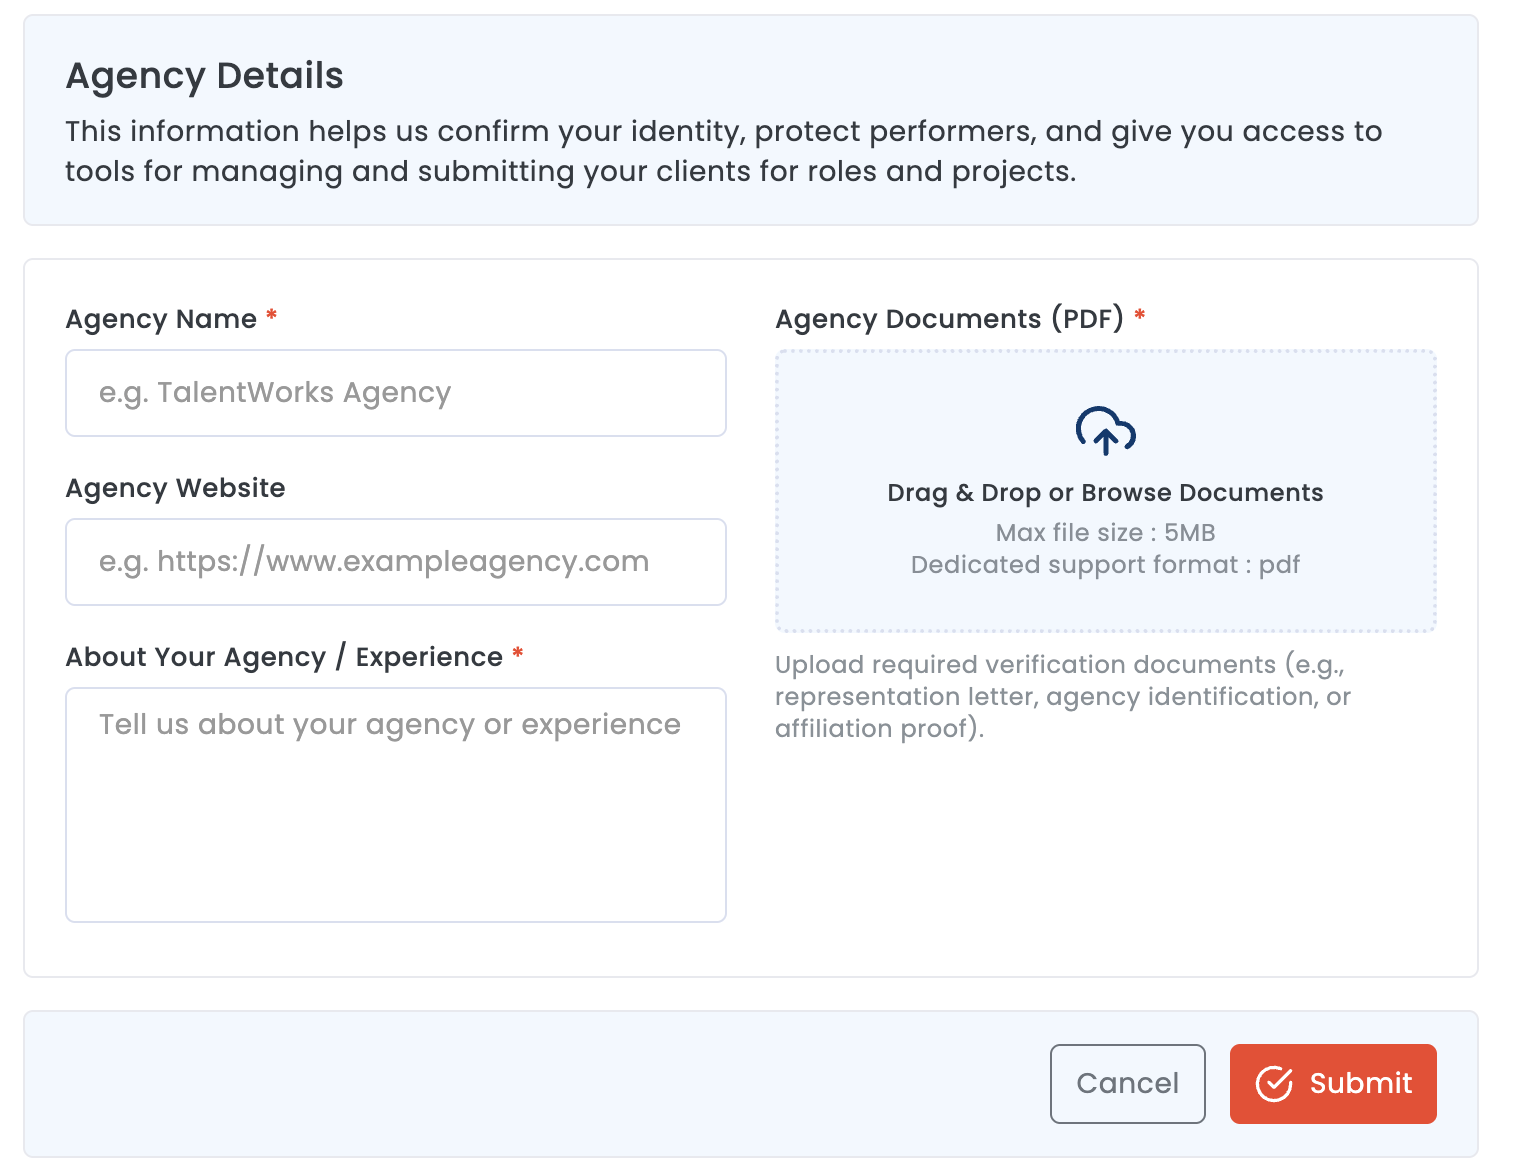
Display Name: For companies & Organizations it’s usually best to use the company name for your display name and a logo for the profile photo to help people find your organization.
AGENTS: When you select Agent/Manager role you will be notified to register as a representative.
CREATE YOUR ROSTER: Add each of your clients and send them a request to represent them. Once confirmed, they will appear on your roster and you’ll be able to submit your clients for work.
TAG SKILLS & ROLES:
Tag your profile with your roles and skills, making it easier for hiring companies to find you. Each role has skills and sub-skills to help specify your expertise.
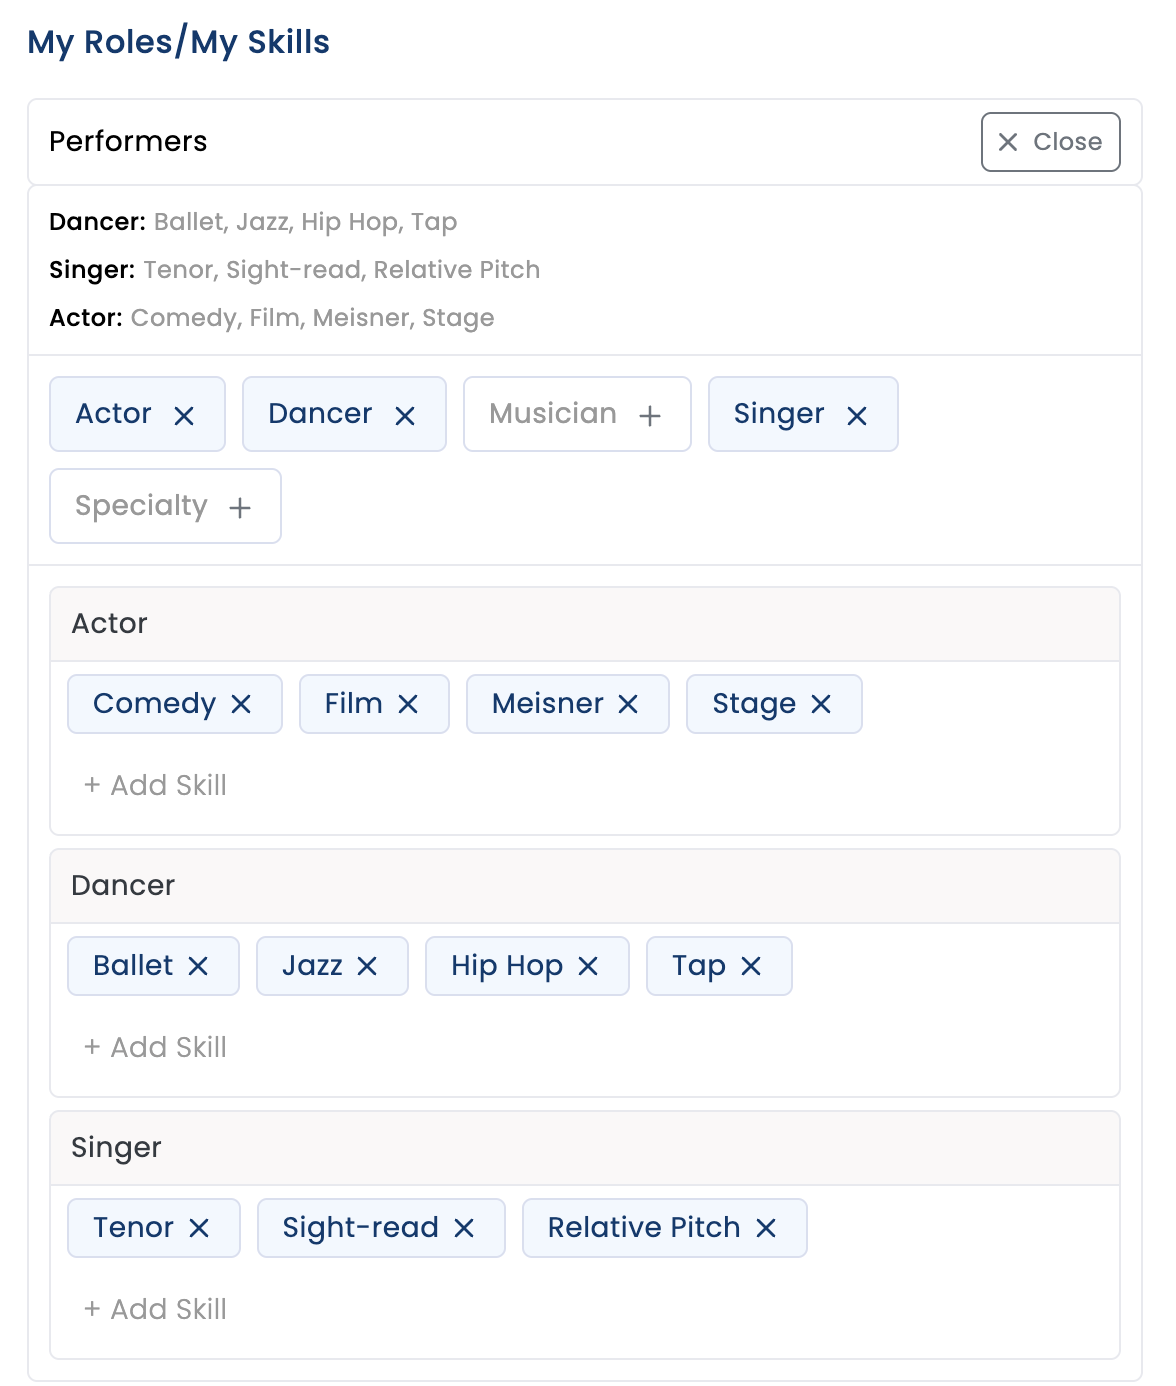
Performers: Actor, Dancer, Musician, Singer, Specialty
Companies: Arts Organization, Producer, Presenter, Service Provider
Creative Team: Writer, Director, Choreographer, Designer, Arranger
Casting: Casting Director, Agent, Manager
Production Team: Production Manager, Company Manager, Stage Manager, Marketing, Crew, Wardrobe, Box Office, Ushers, etc.
Education: Instructor, Professor, Teaching Artist
Survival: Admin, Hospitality, Media, Transport, Real Estate, Spa/Fitness, Service
PRO TIP: Be as specific as possible in your tags as the tags serve to allow hiring companies to filter for specific skills.
IMPORTANT: After you have made your selections > SAVE.
HOW ARE ROLES/SKILLS USED? When users go to the database they can search and filter for any roles, skills, characteristics that might be a good fit for a role.
See a role that’s missing? Suggest one here.
PHYSICAL CHARACTERISTICS:
Identify traits and characteristics about yourself to assist individuals to learn about your and your background. You can choose to show or hide any of these elements on your profile.
Gender Identity, Pronouns: Identify your gender identification and pronouns.
Sexual Orientation: Identify your sexual orientation.
Disability: Indicate any disability.
Ethnicity, Culture, Race: Indicate any that apply to you.
FOR PERFORMER PROFILES ONLY:
Age Range: Indicate what your age range is to portray in roles.
Height: Indicate your height
Gender Portrayal: Indicate which gender/s you are comfortable portraying onstage
FOR ORGANIZATION PROFILES:
You should leave out any personal details.
HOW IS THIS INFORMATION USED: When telling stories on stage, it’s imperative to include individuals who might understand and identify with the story being told.
For example, for THE LOST COLONY in North Carolina, there is a major portion of the story that includes Indigenous characters and it’s imperative that the cast that identifies as Indigenous should portray those roles. Additionally, the creative team really wants to have Indigenous professionals on the creative and production team.
CREDITS:
Profile > Edit Profile > Credits
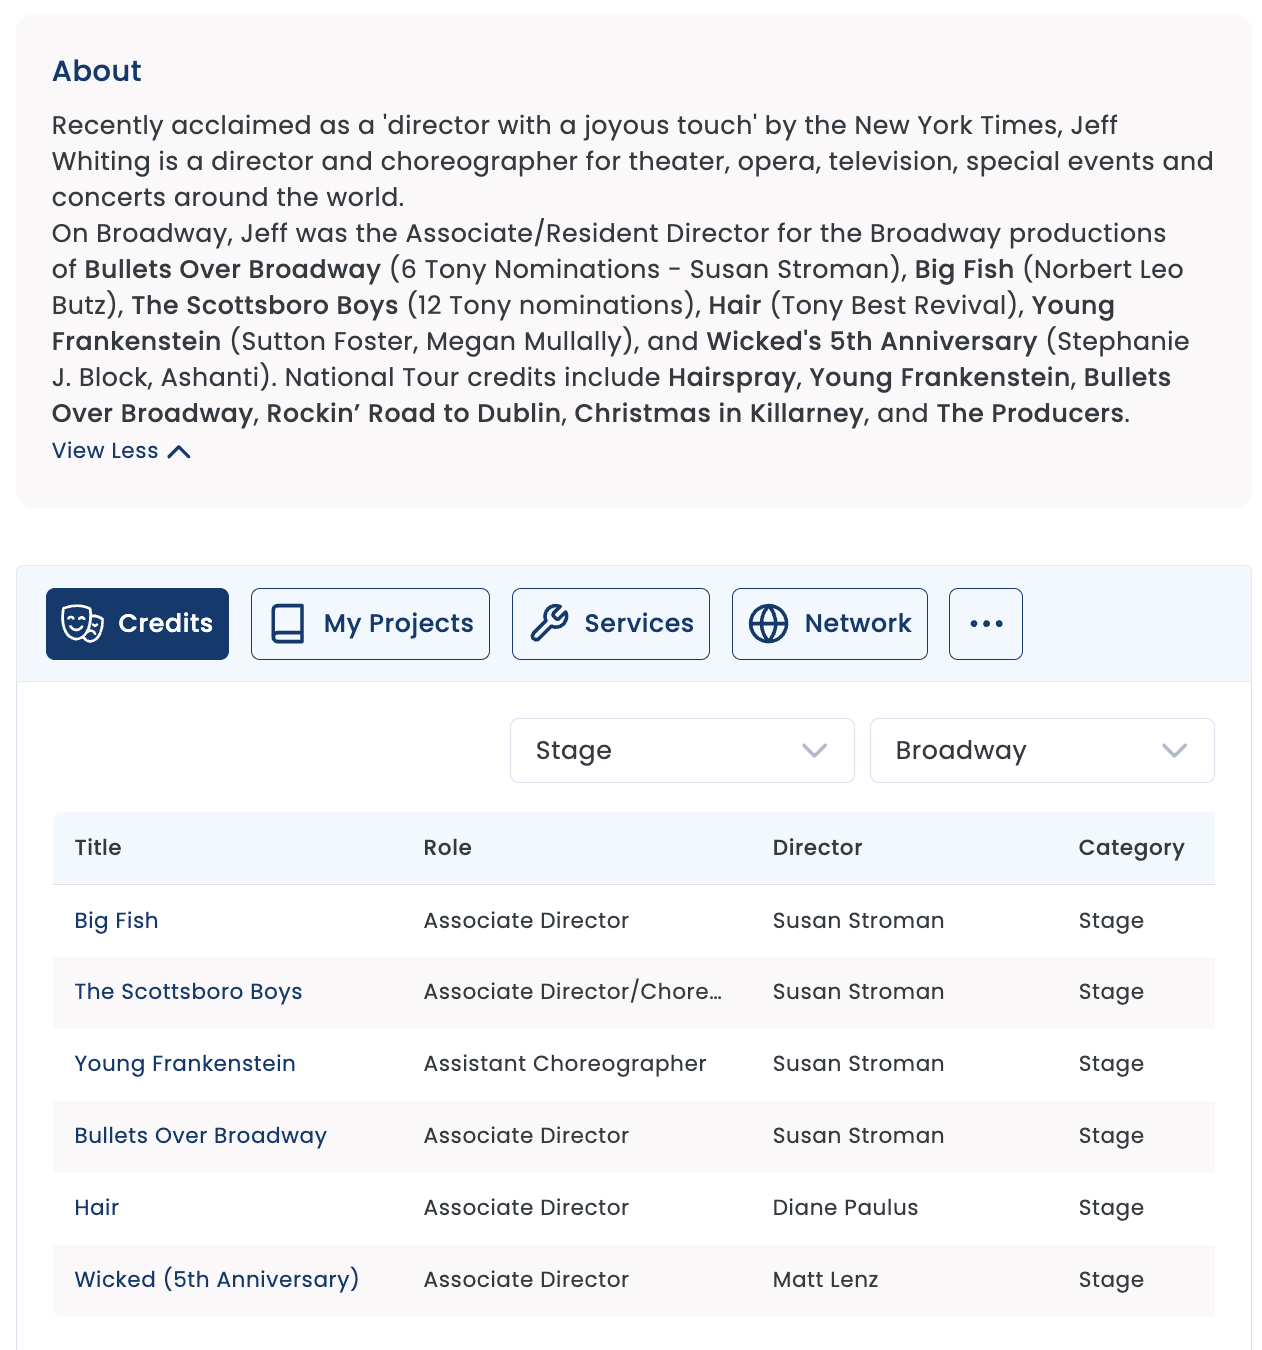
Bio: Add a bio with your credits which appears next to your profile.
Credits: Add your credits including
Show Title
Role
Director
Category: Stage, Television, Feature Film, Short Film, Other
Company
Year
Manual Edit: Tap ADD CREDIT and enter details one at a time. To re-edit a credit already entered, tap the edit icon at the right side of each line.
Import from File: You can import your entire credits quickly. Tap UPLOAD CSV to upload a file. Download the template to make it easy.
Please ensure your CSV follows these rules:
Category must be one of the following: Stage, Television, Feature Film, Short Film, Other
Year must be a 4-digit number between 1950 and the current year
Remove any blank rows
Save the file as CSV (Comma delimited)
Re-Order Credits: Tap SORT CREDITS to drag items to the order you prefer to be seen.
PRO TIP: Put your best stuff first, not in chronological order to ensure better visibility when users are quickly scanning your credits.
Union Status: Indicate any union affiliations you have.
Seeking: Indicate what kinds of opportunities you are currently seeking. This will assist companies to match with you.
PDF Resume & other PDF: You can also upload a PDF of your resume and any other PDF files that will help people learn about you.
SOCIAL MEDIA CHANNELS:
Profile > Edit Profile > Social Media:
Link to all of your social channels from your profile, including your Website, Instagram, Facebook, YouTube, Tiktok, LinkedIn, X. These links all appear on your profile for easy sharing.
NOTIFICATIONS:
Profile > Edit Profile > Notifications
EMAIL NOTIFICATIONS: Indicate what type of notifications you receive including:
Job Posts that match your roles and skills, union status, etc. Select all that you wish to include.
TIMINGS: You can choose how often to receive notifications:
Instant: Receive notifications immediately when new job postings are available
Daily Summary: Receive a summary of job postings once per day
Weekly Summary: Receive a summary of job postings once per week
None: I don’t want to receive any job notifications at this time
Getting too many notifications? You can turn them off at any time.
SECURITY:
Profile > Edit Profile > Security:
Change your password on this page.
Forgot your password? Click on ‘forgot password’ on the log in page.
PORTFOLIO:
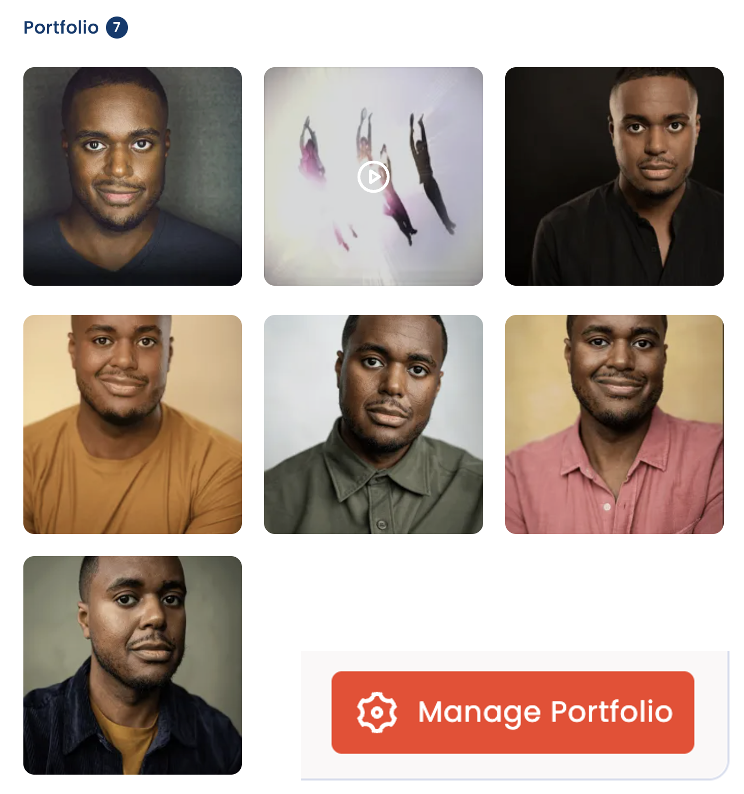
Profile > Manage Portfolio:
MANAGE PORTFOLIO > ADD MEDIA:
Add PHOTO > Choose File > Upload
File must be less than 50MB.
Add VIDEO > Choose File > Upoad
File must be less than 500MB (format MP4)
Add VIDEO LINK > Paste URL
Paste YouTube or Vimeo link.
Caption and Description: Tap the edit icon under the media to add a Caption and Description. This information will appear at the bottom of the media when viewed on your profile.
SORT MEDIA ORDER: Re-order your media by tapping SORT MEDIA and then move each thumbnail to the desired order. Then hit SAVE ORDER.
MY PROJECTS:
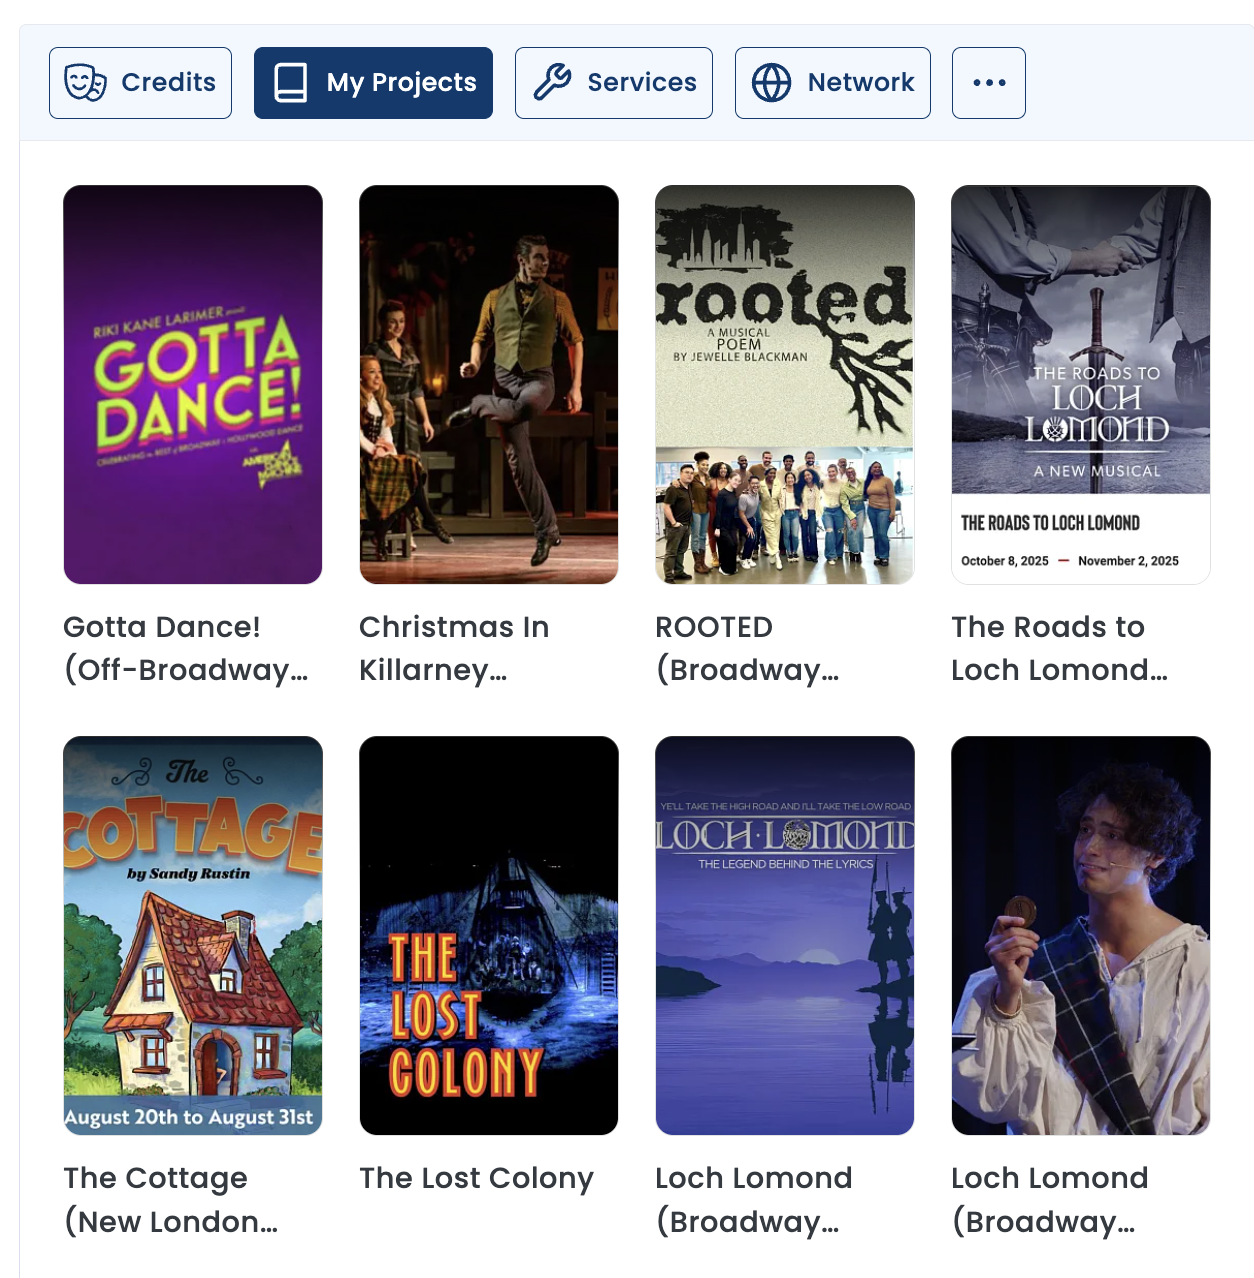
Profile > My Projects:
Any productions you have been tagged in appear in this area on your profile. A tag indicates that you have been listed in a role on any production. If you believe you are incorrectly tagged in a project, you can make a suggestion on the production and our team will investigate.
The Stage Door Network Archive: Our mission is to create an all-encompassing archive of all live productions – commercial, regional, community, educational, etc.
The Stage Door Pass is a fan platform for theatre fans to log shows and share their thoughts about what they see. Every production in the networks, appears in both locations.
Learn more about STAGE DOOR PASS.
Missing a project? It’s easy to add a production.
Learn about this in PRODUCTION ARCHIVE section.
MY SERVICES:
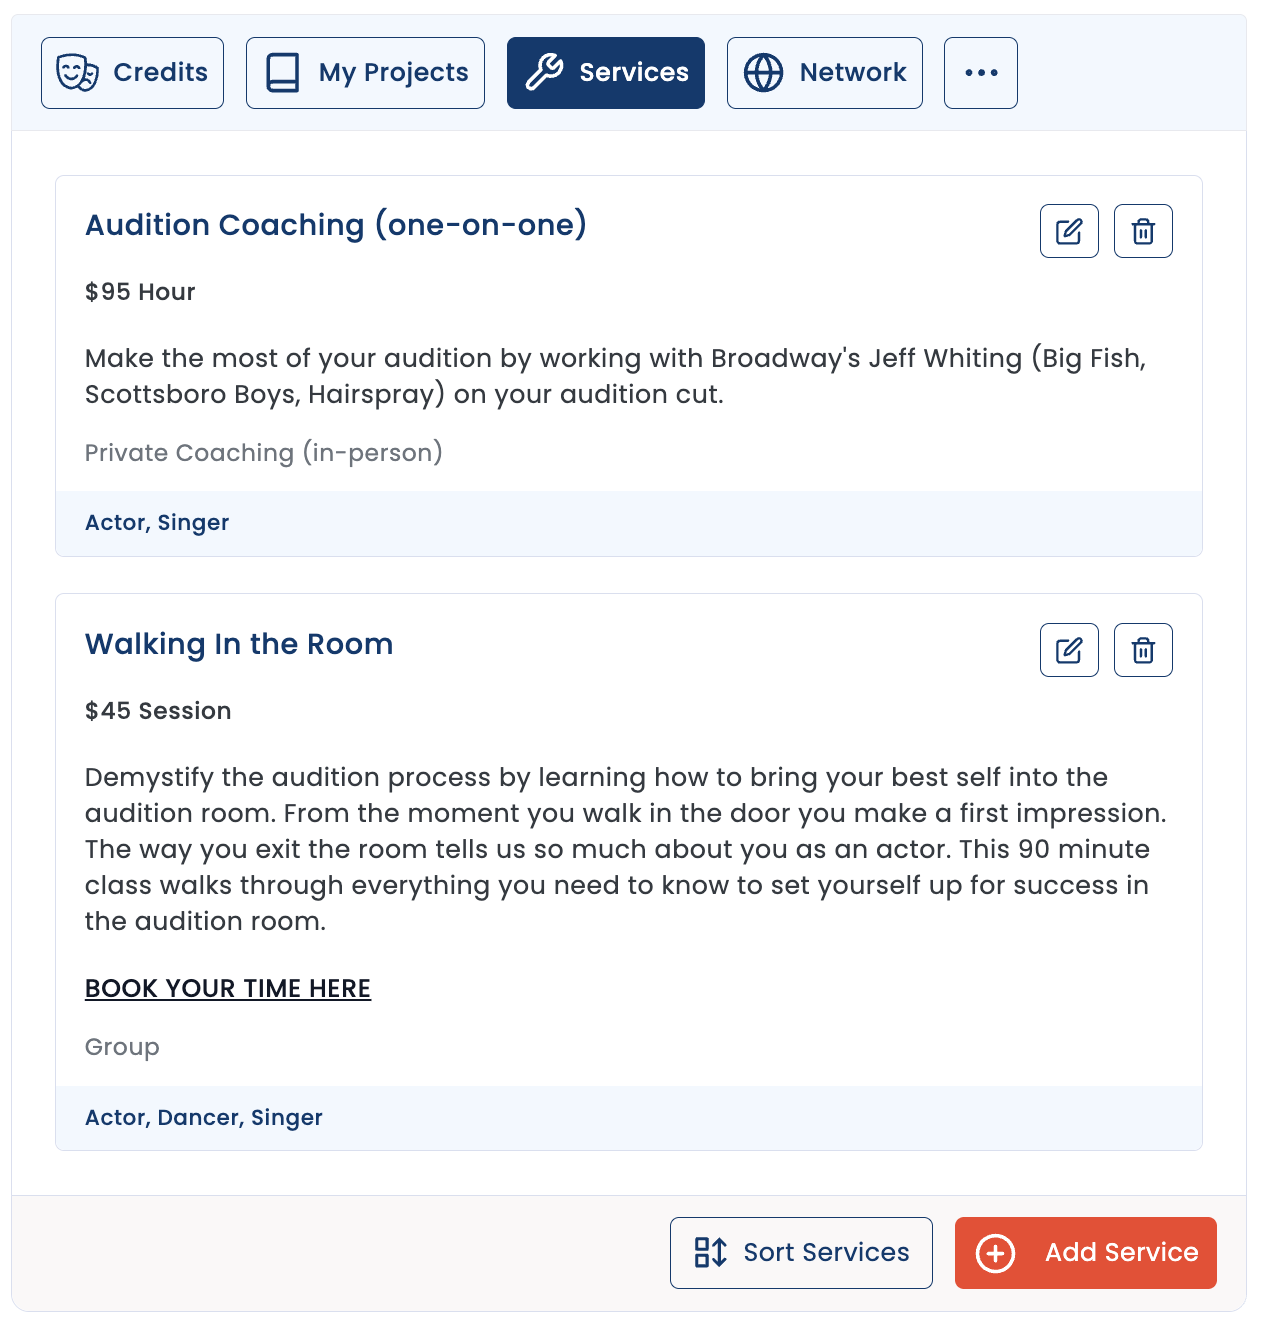
Profile > Services > Add Service:
If you teach a workshop or offer classes you can feature them in the SERVICES section on your profile where you can share details of what you offer. Create a service for each, including details on:
Name of Service: Choose a straight-forward title that helps explain what you offer.
Type of Service:
Advisory:
Creative Services
Group Classes
Management Services
Master Class
Private Coaching
Rate: Share your rate
Description: Give a compelling description of what you offer.
Skills/Roles: Tag the skills related to the service offering. For example, for an audition class, you might tag ‘actor’ and ‘singer’.
MY NETWORK:
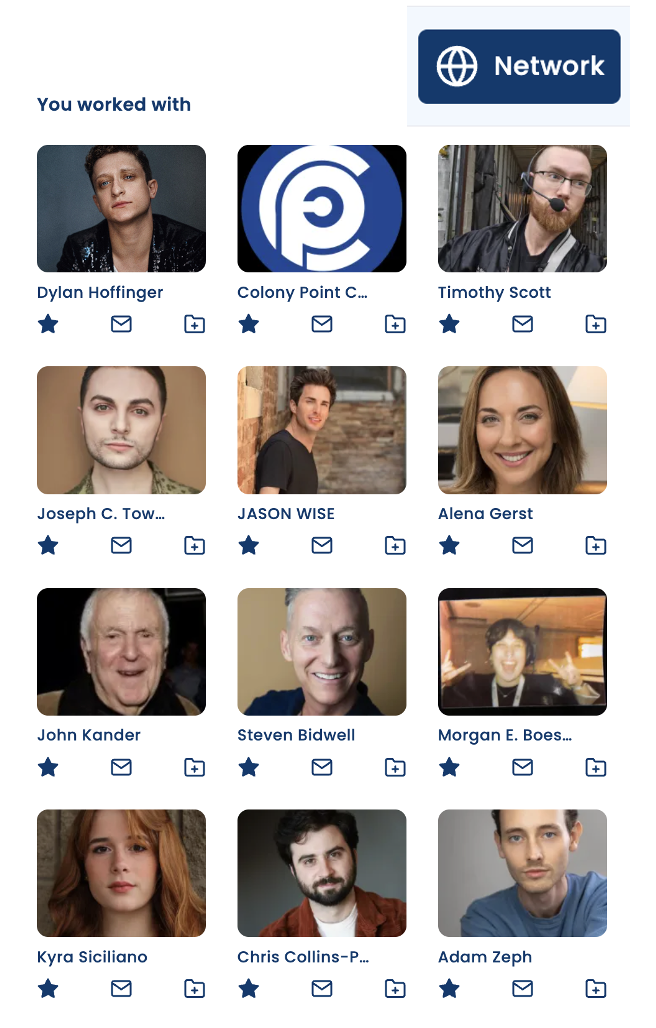
Profile > Network:
On this page you will see any account who has been added to your network. You can message them or add them to any folder.
PRO TIP: Keep a folder of some of your favorite professionals. Ideas include “Scene Partner” or “NY Pianist” or “Improv Actors” to help you make the most of your connections.
Add someone to your network:
On their profile, tap on JOIN MY NETWORK below their profile photo. They will receive notification and can accept the invitation.
Once they have accepted, your request they will appear in your network.
RECOMMENDATIONS:
Profile > Recommendations
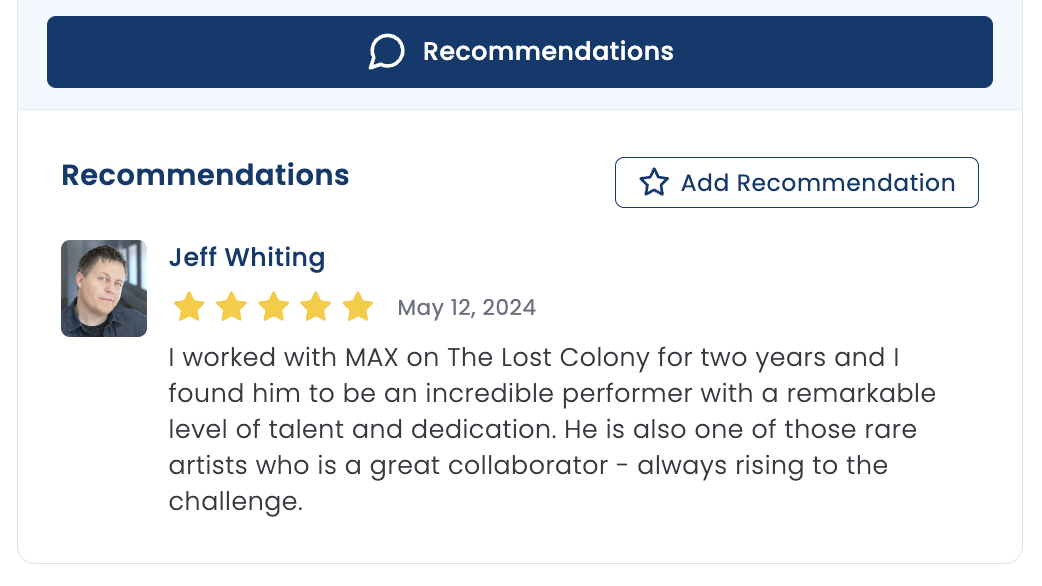
On this tab you can see any recommendations that have been left for you.
Get Recommendations: Ask colleagues to write a review about their experience working with you so other people considering you will have some additional insight to your work.
Write Recommendations: Go to the profile for the individual > Go to Recommendations > Add Recommendation
Rating: give them a rating (up to 5 stars)
Description: write something in the description about your experience working with them.
Remove: If you wish to remove any recommendation, tap ‘Remove’ on the right side of the recommendation and our team will remove it for you.